Monday, January 28, 2013

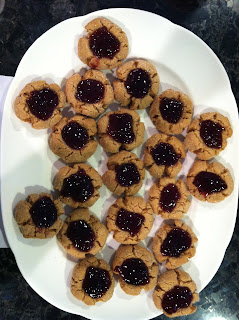
PeanutButter Jelly Cookies

Remember that obnoxious (and wonderful) PeanutButter Jelly Time video on YouTube?

That song, partially, inspired these cookies.  The other inspiration was Patrick.


Patrick really loves Peanut Butter and Jelly sandwiches and, for his birthday cookies, I thought he'd enjoy his favorite sandwich as a cookie.

These cookies were really fun to make and Patrick loved them!


PeanutButter Jelly Cookies
(adapted from Martha)
(makes 2 dozen)


1 1/4 cups all-purpose flour
1/2 teaspoon baking powder
1/2 teaspoon baking soda
1/2 teaspoon salt
3/4 cup smooth peanut butter
4 ounces (1 stick) unsalted butter, softened
1/3 cup packed light-brown sugar
1/3 cup granulated sugar, plus more for rolling
1 large egg
1 teaspoon pure vanilla extract
1/2 cup grape jelly (or any jelly)

Directions

Preheat oven to 350 degrees. 
Whisk together flour, baking powder, baking soda, and salt; set aside.

Beat peanut butter and butter with a mixer on medium speed until smooth. Add sugars, and beat until pale and fluffy.  Add egg and vanilla, and beat until incorporated. Reduce speed to low. Add dry ingredients, and mix until combined.
Scoop level tablespoons of dough, and form into balls. Roll each ball in granulated sugar and place on baking sheet.

Bake until cookies are puffy, about 10 minutes. Remove from oven, and make indentations in centers by pressing with the handle end of a wooden spoon. 

Return to oven, and bake until edges are golden, 6 to 7 minutes more. Transfer sheets to wire racks, and let cool completely.

Heat jelly in a small saucepan, stirring, until loosened, about 30 seconds. Spoon about 1/2 teaspoon into each indentation. 


ENJOY!!!!

Monday, January 21, 2013

Dad's Cookies

Now that 2012 is in the books, I wanted to go over all the cookies that comprised my Dad's Cookie of the Month Club membership.

In many ways, be it good or bad, I am a lot like my Dad.
I share his sense of humor.
I can thank him for the blonde hair!
And my Dad and I are super close
(Despite living 250miles away!)
Thank goodness for cell phones and the fact that he now texts!


The idea played out over the course of 10ish months:
Dec 26, 2010: I have no ide what to get Dad for Christmas next year. It's okay. I have a year to figure it out.

May 27, 2011: Dad likes to eat.

September 23, 2011 : Dad ALWAYS compliments my cookies and made 
not-so-subtle insinuations that he'd like to have MORE

(Dad's favorite food group is "Hot and Massive")

October 5, 2011: I got it.  I should create a "cookie club" where I send him homemade treats every month!

And that's where the idea came from. Dad's Cookie of the Month Club

Christmas 2011: Initiation into "the Club"

(These the cookies my dad BRAGS about. 
It was an obvious choice for the inaugurational month)

January 2012: Brown Butter Toffee

February 2012: Heart Shaped Thin Mints*

March 2012: Oreo Crunch*

April 2012: Carrot Cake Cookies

September: Trail Mix Cookies


(cookies with the asterisk mean the recipe is coming soon!)

This adventure was well appreciated by Dad and, also, required a lot of time.  I wouldn't have done anything else but I did get him a gift for Christmas 2012. 


Monday, January 14, 2013

Ice Cream Cone Cupcakes

Does anyone else remember these cupcakes?  I only remember enjoying these at my sister's birthday party... the same year I told her all of her presents.  


(Coincidentally I think that was the year people realized I can't keep secrets...)


Anyways, these cupcakes combine the excitement of a cupcake with ice cream and none of the mess.

I made them at the end of the year last year as a celebratory treat for my classmates finishing up our first year of grad school.  One of my classmates requested them and how could I refuse?


Chocolate Chip Brownie Ice Cream Cone CupCakes
(from Cupcakes! by Elinor Klivans)
(makes 12 cupcakes)


Ingredients:
12 flat-bottomed ice cream cones
1/2 cup (1 stick) unsalted butter, cut into pieces
3 oz unsweetened chocolate (baking chocolate works)
3/4 cup unbleached all-purpose flour
1/2 tsp baking powder
1/4 tsp salt
2 large eggs
1 1/4 cups sugar
1 tsp vanilla extract
2/3 cup (4 oz) semi-sweet chocolate chips

Frosting

1 stick butter, at room temperature
1 tsp vanilla
2 1/2 cups powdered sugar
(1 TBS milk- if necessary) 

Directions

Preheat the oven to 325°F.
Place butter and unsweetened chocolate into double boiler and melt until creamy and completely melted. Set aside, but keep warm. Combine flour, baking powder and salt. Set aside.

In a large bowl, mix eggs and sugar on medium speed until the mix is thick and cream-colored, roughly 2 minutes. Stop the mixer and scrape the bowl if necessary. On low speed, first add the vanilla until completely combined, then the chocolate mix until completely combined. Continue mixing on low and mix in the flour mixture until completely smooth, then mix in the semi-sweet chocolate chips.

Fill each ice cream cone to just below the top of the cone. Make sure the batter is even at the top of the ice cream cone; try to fill in any holes. Place one flat bottomed ice cream cones into each cupcake spot in the cupcake tin.

Bake for about 28 minutes, or until a toothpick can be inserted and come out clean. (If you hit a chocolate chip, try another spot).  (if it’s not clean, check again in 2 minutes) Let the cupcakes cool for 20 minutes in the cupcake tin.

Frosting Directions

Cream butter in the bowl of an electric mixture until completely smooth and creamy. With the mixer on low speed, add in powdered sugar slowly. Gradually increase mixer speed and add vanilla, then beat for 2-3 minutes, scraping down sides and bottom of the bowl. If frosting is too thick, add milk 1 teaspoon at a time until desired consistency is reached If it’s too thin, add sugar gradually until it thickens. Frost cupcakes and top with sprinkles. 


ENJOY!!!!


Monday, January 7, 2013

Orange Sesame Chicken

I love my cast iron skillet! I don't think my Dad ever used his frequently but there is something cool about the fact that mine is a hand-me-down.  

Or maybe it's the fact that you can make an ENTIRE meal in one dish?


This was my first time making orange chicken and it was the best orange chicken I have EVER had.  

The kids I babysit (Patrick and Sally) both said it was the BEST chicken they've ever had!


Orange Sesame Chicken
(adapted from How Sweet It Is)
(serves 4)

2 pounds boneless/ skinless chicken breasts- cubed

1/2 teaspoon salt
1/2 teaspoons pepper
3 tablespoons flour


2 tablespoons toasted sesame oil (divided)

1 tablespoon olive oil


2 garlic cloves, minced
1 tablespoon low-sodium soy sauce
1 tablespoon brown sugar
1 tablespoon white vinegar
1/2 cup low-sodium chicken stock

1/2 cup orange juice (I used no pulp)

2-3 tablespoons toasted sesame seeds
6 clementines (peeled and sectioned)


Rice 

Directions
Preheat oven to 400 degrees F. In a bowl, whisk together chicken stock, orange juice, brown sugar, 1 tablespoon sesame oil, garlic cloves, soy sauce and vinegar. Set aside.

Heat a large oven-proof skillet over medium-high heat. Toss chicken with salt, pepper and flour. Add olive oil and 1 tablespoon sesame oil to skillet, and once hot, add chicken in a single layer. Cook until seared and golden on one side, then flip and cook until golden again, about 2-3 minutes. 

Pour chicken stock mixture over top and toss to coat, then turn off heat. Place skillet in oven and bake for 20 minutes. Remove and sprinkle with sesame seeds. Serve with rice and veggies.


ENJOY!!!